Jekyll2021-12-01T19:58:58+00:00https://rmconway.com/feed.xmlRyan ConwayBeep boop.Ryan ConwayGoodbye, Moto X2020-10-30T00:50:00+00:002020-10-30T00:50:00+00:00https://rmconway.com/goodbye-moto-x<p>In February of 2014, I bought a first-gen Moto X. Last week, six and a half years later, I retired it. I’m going to miss it.</p>
<p>It’s not as mighty as it once was. One of the volume buttons only works if I press it real hard. The other one doesn’t work at all. Sometimes the GPS doesn’t work, and I need to look around for my cross street and manually enter my starting location. Some apps only work partially or don’t work at all, because its last update was Android 5, and neither its manufacturer nor app developers chose to support it further.</p>
<p>But for the most important things? It’s great. The power button works. Calls work. Texting works. The original battery still lasts a full day on standby.</p>
<p>In fact, the only reason I’m getting rid of it is because too much of it still works. It still runs web browsers, so a mindless distraction is there whenever my subconscious wants it. It still runs messenger apps, so conversations, with great company but foreign contexts, regularly seek my attention.</p>
<p>My mind works best when it has just one thing to direct its attention to, and a smartphone, armed even with only basic apps, eagerly presents second things. All day, every day.</p>
<p>I could, of course, choose to ignore those things. But I’ve come to accept that making that choice requires energy. Energy that comes from the same finite pool from which I draw to work, to interact with loved ones, to focus on things that help me relax.</p>
<p>So here’s its replacement. It has no app store and a tiny screen. It’s nothing I don’t want it to be.</p>
<p><img src="/assets/img/goodbyemotox/20201030_003849.jpg" alt="Replacement phone: LG L125DL" /></p>
<p>I’m going to miss my Moto X, because it treated me well. I hope it’s the most capable phone I’ll ever want.</p>Ryan ConwayI'll miss you.Using Elastic APM with Scalatra2020-08-14T00:47:00+00:002020-08-14T00:47:00+00:00https://rmconway.com/elastic-apm-scalatra<p>Elastic APM hooks into Scalatra pretty easily. Since APM’s Java agent <a href="https://www.elastic.co/guide/en/apm/agent/java/current/supported-technologies-details.html#supported-app-servers">supports the servlet API</a>, particularly Jetty, you can instrument a Scalatra app by just <a href="https://www.elastic.co/guide/en/apm/agent/java/current/setup-javaagent.html">slapping on the agent</a>.</p>
<p>But you may notice the resulting transaction names have only the request’s method and servlet’s name. For example, all <code class="language-plaintext highlighter-rouge">GET</code>s in <code class="language-plaintext highlighter-rouge">HealthServlet</code> will fall under the transaction name <code class="language-plaintext highlighter-rouge">HealthServlet#doGet</code>:</p>
<p><img src="/assets/img/elasticapmscalatra/doget.png" alt="HealthServlet transaction names" /></p>
<p>This is much better than no monitoring at all, but if you’ve got multiple routes in a single servlet, you may wish to disambiguate them.</p>
<p>Fortunately, getting more precise transaction names isn’t too hard. By extending <code class="language-plaintext highlighter-rouge">ScalatraServlet</code>, you can hook into your routes and set a unique transaction name for each. Observe:</p>
<div class="language-plaintext highlighter-rouge"><div class="highlight"><pre class="highlight"><code>import co.elastic.apm.api.ElasticApm
import org.scalatra.{PathPatternRouteMatcher, RailsRouteMatcher, RegexRouteMatcher, Route, RouteTransformer, ScalatraServlet, SinatraRouteMatcher}
trait ScalatraApmServlet extends ScalatraServlet {
/**
* Calculate the route portion of an APM transaction name.
*
* We ignore a couple matchers that don't have obvious text representations. This should be fine for most purposes.
*
* @param transformers The route's transformers.
* @return Transaction name path.
*/
private def getApmTransactionPath(transformers: Seq[RouteTransformer]): String = {
val transformersWithPath = transformers.filter {
case _: PathPatternRouteMatcher => true
case _: RailsRouteMatcher => true
case _: RegexRouteMatcher => true
case _: SinatraRouteMatcher => true
case _ => false
}
val concatenated = transformersWithPath.map(_.toString).mkString("; ")
if (concatenated != "/") {
concatenated
} else {
""
}
}
private def wrapWithApmTransactionName(transactionPath: String, action: => Any): Any = {
ElasticApm.currentTransaction.setName(s"${request.getMethod} ${request.getServletPath}${transactionPath}")
action
}
override def get(transformers: RouteTransformer*)(action: => Any): Route = {
val transactionPath = getApmTransactionPath(transformers)
super.get(transformers: _*) { wrapWithApmTransactionName(transactionPath, action) }
}
override def post(transformers: RouteTransformer*)(action: => Any): Route = {
val transactionPath = getApmTransactionPath(transformers)
super.post(transformers: _*) { wrapWithApmTransactionName(transactionPath, action) }
}
override def put(transformers: RouteTransformer*)(action: => Any): Route = {
val transactionPath = getApmTransactionPath(transformers)
super.put(transformers: _*) { wrapWithApmTransactionName(transactionPath, action) }
}
override def delete(transformers: RouteTransformer*)(action: => Any): Route = {
val transactionPath = getApmTransactionPath(transformers)
super.delete(transformers: _*) { wrapWithApmTransactionName(transactionPath, action) }
}
override def options(transformers: RouteTransformer*)(action: => Any): Route = {
val transactionPath = getApmTransactionPath(transformers)
super.options(transformers: _*) { wrapWithApmTransactionName(transactionPath, action) }
}
override def head(transformers: RouteTransformer*)(action: => Any): Route = {
val transactionPath = getApmTransactionPath(transformers)
super.head(transformers: _*) { wrapWithApmTransactionName(transactionPath, action) }
}
override def patch(transformers: RouteTransformer*)(action: => Any): Route = {
val transactionPath = getApmTransactionPath(transformers)
super.patch(transformers: _*) { wrapWithApmTransactionName(transactionPath, action) }
}
}
</code></pre></div></div>
<p>If you make your servlets extend <code class="language-plaintext highlighter-rouge">ScalatraApmServlet</code> instead of <code class="language-plaintext highlighter-rouge">ScalatraServlet</code>, their routes will be distinguished in APM.</p>
<p>This works because when an <code class="language-plaintext highlighter-rouge">action</code> is evaluated, the APM agent will have already established a transaction for us. We’re just overriding its name.</p>
<p>I use this with Scalatra 2.7.0. I imagine it’s prone to breaking with future Scalatra releases, but am hopeful it won’t be too hard to adapt when that happens.</p>Ryan ConwayAnd getting precise transaction names.Ostrich: A Game Boy Sound System Player2017-02-11T14:53:00+00:002017-02-11T14:53:00+00:00https://rmconway.com/ostrich<p>Ostrich is a macOS app for playback of Game Boy Sound System files.</p>
<p>Its retro interface visualizes the Game Boy’s pulse audio channels. Under the covers, it’s a Nintendo Game Boy emulator written in Swift.</p>
<p>This app came way further than I expected it to. I owe a lot of that to <a href="http://austinzheng.com">Austin Zheng</a> and his Swift tutelage. Love of retro game music and interest in embedded devices also helped.</p>
<iframe width="560" height="315" src="https://www.youtube.com/embed/lEO4qYbvHXk" frameborder="0" allowfullscreen=""></iframe>
<p></p>
<p>This post is mostly a discussion of the app’s implementation. You can <a href="#gallery">skip to the gallery</a>, or <a href="https://github.com/PumpMagic/ostrich">build it yourself</a>.</p>
<h1 id="overview">Overview</h1>
<p>A Game Boy Sound System file captures the bits of machine code in a Game Boy game that produce its music and sound effects. GBS files are audio synthesis instructions, and GBS players execute these instructions.</p>
<p>Ostrich is comprised of</p>
<ul>
<li>a Sharp LR35902 emulator
<ul>
<li>a CPU emulator</li>
<li>an APU (audio processing unit) emulator with AudioKit output</li>
</ul>
</li>
<li>RAM, ROM, and data bus emulators</li>
<li>a GBS parser and media player model</li>
<li>a UI built on AppKit / Cocoa</li>
</ul>
<h1 id="sharp-lr35902">Sharp LR35902</h1>
<p>The Game Boy’s SoC, the Sharp LR35902, bundles computational and audio synthesis abilities. Its CPU is a lot like the Zilog Z80. Its audio unit is controlled by writing to a small region of memory.</p>
<h2 id="cpu-emulator">CPU Emulator</h2>
<p>The CPU is a class with an eight-bit integer for each core register. The logical registers and flags are wrappers of these core registers. Instructions are modeled as generic functions that accept data types of particular width and read/writeability, so that a single function may capture most or all variants of a given instruction family. Like ADD or LD.</p>
<p>Instruction parsing is.. a really big switch statement.</p>
<h2 id="apu-emulator">APU Emulator</h2>
<p>The APU is modeled as a 48-byte RAM. It interprets writes as a normal memory would, but also passes the relevant data to independent representations of audio channels. Each audio channel has its own representations of frequency bits, duty bits, etc., and exposes a clock function that manipulates these representations and controls its AudioKit output.</p>
<h1 id="game-boy-emulator">Game Boy Emulator</h1>
<p>The Game Boy itself is modeled as an owner of an LR35902, some RAM, a data bus connecting everything, and, optionally, a game cartridge. It exposes means of inserting and removing cartridges, and exposes its LR35902 to anyone who wishes to clock it or have it call specific addresses.</p>
<h1 id="media-player">Media Player</h1>
<p>The media player is an owner of a Game Boy. When the user loads a GBS file, the player generates and inserts a cartridge into it. When the user plays a song, the player resets the Game Boy’s memory, initializes some of its registers like the stack pointer and program counter, calls a given address, and begins clocking it. The media player is a model, in the MVC sense, and is commanded by the controller.</p>
<h1 id="user-interface">User Interface</h1>
<p>The user interface is modeled after the original Dot Matrix Game Boy. It uses AppKit (Cocoa) to render playback data, including audio channel waveforms, and presents controls adapted from photos of the Game Boy’s hardware. The interface leverages AppKit’s Auto Layout and stack views to fit most desired sizes and orientations.</p>
<h1 id="gallery"><a name="gallery"></a>Gallery</h1>
<p><img src="/assets/img/ostrich/1.png" alt="A wild Ostrich appeared" /></p>
<p>Watching the pulse waveforms bounce around is so satisfying. Especially during intricate tunes like Double Dragon’s.</p>
<p><img src="/assets/img/ostrich/action-3.gif" alt="Beeps and boops in harmony" /></p>
<p>Auto Layout is amazing. Here’s a shot of the UI fully shrunk - the text goes into a Winamp-esque scroll mode when it doesn’t fit in the display.</p>
<p><img src="/assets/img/ostrich/2.png" alt="A baby Ostrich" /></p>
<p>It’s come a long from its statically sized start.</p>
<p><img src="/assets/img/ostrich/wip-2.png" alt="A primal Ostrich" style="width: 60%; " /></p>
<p></p>
<p>Thanks for reading!</p>Ryan ConwayLearning Swift and Cocoa by writing an emulator. 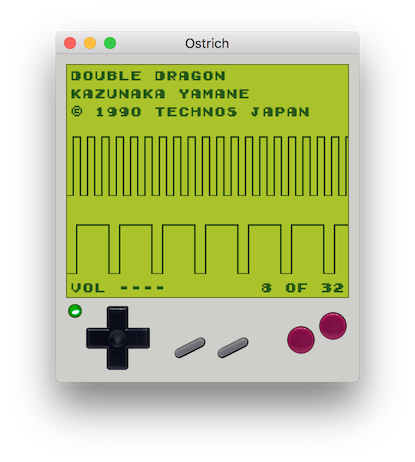Word Clock2017-01-19T21:59:00+00:002017-01-19T21:59:00+00:00https://rmconway.com/word-clock<p>A <strong>word clock</strong> communicates the time with letters rather than numbers or hands.</p>
<p>I made this one as a Christmas gift for my dad in 2016. This post is a high-level retrospect of its development; the schematic, parts list, and firmware are linked toward the end.</p>
<p>Before going too far, I want to point out that this turned out to be a beta build. I wound up with a rat’s nest of wires, crammed components, and light bleeding through the baffles. It was a good proof of concept, but I took what I learned and made a second version with a custom PCB, and the results were way better. See <a href="#addendum">Addendum</a>.</p>
<h1 id="overview">Overview</h1>
<ul>
<li>Tech: ATMega328P + DS3231 + 98 5mm LEDs</li>
<li>Chassis: IKEA Ribba shadow box</li>
<li>Build date: November - December 2016</li>
</ul>
<h1 id="design">Design</h1>
<p>The word clock is a popular project among electronics hobbyists. It’s taken <a href="https://www.google.com/search?site=&tbm=isch&source=hp&biw=1216&bih=699&q=word+clock+diy">many different forms</a>.</p>
<p>To me, its appeal is its elegance. It’s colloquial and casually imprecise, but accurate enough for most needs.</p>
<p>I thought <a href="http://www.instructables.com/id/Sleek-word-clock/">scottbez1’s instructable</a> captured that philosophy well, so I based my design heavily on his. Some of this repeats his work, but I made changes along the way.</p>
<h1 id="letter-mask">Letter Mask</h1>
<p><img src="/assets/img/wordclock/IMG_0088.JPG" alt="Letter mask" /></p>
<p>The letter mask is the clock’s face. It sits in front of an array of LEDs, transforming each one’s light into an individual letter.</p>
<p>I made a letter mask in GIMP sized around the chassis’ dimensions. I went with AppleGothic for a sleek look, and left some space around the edges for aesthetics and the non-LED electronics. I placed each letter of the mask in its own cell of a grid, effectively monospacing the font.</p>
<p>I had several copies printed out on transparencies at Kinko’s, cut three to fit, and carefully aligned and adhered them to each other using clamps and double-sided tape. The black ink isn’t perfectly opaque; stacking the sheets prevents light from bleeding through where it shouldn’t.</p>
<p>I cut a hollow rectangle out of amber construction paper and adhered it to the front of the transparencies. It provides some color, and closes openings in the shadow box’s viewable area. I attached a black garbage bag to the rear of the masks to diffuse the light coming from the LEDs, making the display directly viewable and consistently bright.</p>
<h1 id="led-array">LED Array</h1>
<p><img src="/assets/img/wordclock/2016-12-08 18.23.08.jpg" alt="LED array, front" /></p>
<p>The LED array has 98 LEDs, each for an individual letter of the mask.</p>
<p>I made the LED array by punching a bunch of holes in a piece of cardboard. After soldering a resistor to the anode of each LED, I placed each LED in a hole and soldered each resistor to each other to provide a common power connection. I connected the cathodes of each word-forming group of letters to each other, and brought out a wire from each common cathode for connection to the driver board.</p>
<p>Later, I cut some baffles out of a cereal box and adhered them to the mask using hot glue. This minimizes inter-word light bleeding.</p>
<h1 id="driver-board">Driver Board</h1>
<p><img src="/assets/img/wordclock/2016-12-09 20.18.55.jpg" alt="Driver board" /></p>
<p>The driver board gates the ground connection of each word-forming LED group.</p>
<p>Each word sits in front of a Darlington transistor of a ULN2003A chip whose input is a bit of a logical 24-bit shift register formed by three 4094 chips. The 4094s get their register values from a separate control board. I borrowed Scott’s circuit and soldered this board by hand.</p>
<h1 id="control-board">Control Board</h1>
<p><img src="/assets/img/wordclock/IMG_0083.JPG" alt="Control board" /></p>
<p>The control board listens to the user interface, figures out the time of day, and controls which words the driver board lights up. I designed this circuit myself and soldered the board by hand.</p>
<h1 id="microcontroller">Microcontroller</h1>
<p>I chose an ATMega328P for the clock’s brain since I had a few lying around, and AVRs are easy to interface with thanks to the Arduino environment. That said, any chip with basic peripherals and a modest amount of memory - I2C, PWM, analog in, 16K ROM - would have been fine.</p>
<h1 id="rtc">RTC</h1>
<p>The MCU gets the time from a DS3231 RTC. I got one from Adafruit that’s wrapped up in a convenient eight-pin breakout and sports a coin cell battery backup. This backup means the time isn’t lost when the clock is unplugged, at least for 3 to 4 years - the RTC draws about 0.84μA in standby and the battery I picked supplies 38mAh.</p>
<p>The DS3231’s accuracy depends on its environment’s temperature. In the conditions of its paradisiacal southern California home, it’s accurate to a ±2 PPM window. In other words, for every million seconds of actual time that pass, the clock’s time will stray by at most two seconds in either direction. The clock will stray by no more than about a minute per year.</p>
<p>I considered another design that opted for an external crystal rather than an RTC. It would’ve saved on cost, but require custom time-calculating firmware, be less accurate, and a challenge to battery back.</p>
<h1 id="power">Power</h1>
<p>The clock draws from a 7.5V 1A wall adapter. That’s fed raw to the LED array, and regulated down to 5V for the control and driver boards. I chose 7.5V instead of 5V because I didn’t want too much variance in each LED’s brightness when accounting for resistance and diode forward voltage drop tolerances.</p>
<p>I was careful to pull down the driver board’s outputs, so that while the MCU is booting up the driver board won’t turn on all 98 LEDs simultaneously and overload the wall adapter. I picked out an adapter with a fuse just in case.</p>
<h1 id="user-interface">User Interface</h1>
<p><img src="/assets/img/wordclock/IMG_0103.JPG" alt="User interface" /></p>
<p>The user interface has two buttons for time adjustment (hour advance and minute advance) and a potentiometer for brightness adjustment. I sized the buttons to accommodate my dad’s large fingers; he’s 6’5”. The potentiometer controls the output enable pins of the shift registers using PWM for a dimming effect.</p>
<p>Each interface component is panel-mounted to the rear of the shadow box. I hand drilled slots for each; a metric step bit was especially handy, since I didn’t have any metric bits coming into this project.</p>
<h1 id="firmware">Firmware</h1>
<p>After initializing each relevant pin, the firmware regularly polls the inputs and adjusts the RTC’s time and its output enable PWM pin width as appropriate. It periodically queries the RTC for the current time and updates the driver board’s shift registers every five minutes.</p>
<p>Firmware comes naturally to me now thanks to years of experience, so this project’s was pretty straightforward. The most fun I had here was deciding how the clock should respond to the user pressing its buttons. Since the clock is only precise within five minutes, should the minute advance move the time forward by one minute or by five? How long should a user have to hold a button before that button’s action is repeated, if ever, considering the target user? Should the clock reset its second counter when its time is advanced? I spent nearly as much time answering these questions as I did writing the rest of the code.</p>
<h1 id="gallery">Gallery</h1>
<p><img src="/assets/img/wordclock/2016-12-08 18.16.55.jpg" alt="LED array, back" /></p>
<p><img src="/assets/img/wordclock/IMG_0081.JPG" alt="Disassembled word clock" /></p>
<p><img src="/assets/img/wordclock/IMG_0092.JPG" alt="Disassembled word clock" /></p>
<p><img src="/assets/img/wordclock/2016-12-14 05.23.54.jpg" alt="Assembled word clock" /></p>
<p><img src="/assets/img/wordclock/IMG_0079.JPG" alt="Assembled word clock" /></p>
<p><img src="/assets/img/wordclock/IMG_0055.JPG" alt="Assembled word clock" /></p>
<h1 id="documents">Documents</h1>
<ul>
<li><a href="https://docs.google.com/spreadsheets/d/17tVfDLt-0LMc_5vMZl31iws5Pd2t-Ol0GwKcZCI1BNE/edit?usp=sharing">Parts list</a></li>
<li><a href="https://drive.google.com/file/d/0B25ZTvO5IWPTbkVDSGpxVWZGc0k/view?usp=sharing">Schematic</a></li>
<li><a href="https://github.com/PumpMagic/WordClock">Firmware</a></li>
<li><a href="https://drive.google.com/file/d/0B25ZTvO5IWPTaTBoUm1YUEozOXM/view?usp=sharing">Letter mask</a></li>
</ul>
<h1 id="lessons-learned">Lessons Learned</h1>
<ul>
<li>Source your components from reliable sellers on an as-needed basis. I used years-old LEDs purchased on eBay, and several were nonoperational before use. Several more burned out within a few hours of use and needed to be replaced. Desoldering isn’t as easy as soldering.</li>
<li>Size your project components precisely given the chassis before designing anything. I sized the letter mask without properly accounting for the electronics boards that would sit behind it, and had to fit the boards in a really limited space. I had to hack up the perfboards and make some gross serial connections that could’ve been parallel.</li>
<li>Review mechanical diagrams closely before purchasing components, and make sure you have the right tools to mount things. I made incorrect assumptions about the panel-mounted interface components and had to use some hacky drilling techniques to work around missing bit sizes and non-circular hole shapes. A laser cutter would have been lovely here.</li>
<li>Consider designing and fabbing a PCB after proving out the circuit. This project had a ton of electrical connections, and I soldered it all by hand, and it was tedious. Especially the LED array. Your time is valuable, and your project could use the reliability!</li>
<li>Try living with your creation for a while, if it’ll be a gift. Years later I still see this when I visit my parents, which is pretty cool, but then I think dang.. I totally should’ve made the words fade in and out when transitioning instead of having a hard cut.</li>
</ul>
<h1 id="addendum">Addendum</h1>
<p>A few months after giving this as a gift, I received reports that a few more LEDs burned out. Instead of swapping them out, I took the opportunity to use what I learned to do better.</p>
<p>I dumped the circuit into Fritzing, routed it out to a monster 9”x9” board, and got it fabbed. Connecting the controls to the board was kinda jank, but soldering everything was way easier, and didn’t require miles of wire. I also used Cree LEDs instead of eBay ones. They’ve been going strong for four years. Even the <code class="language-plaintext highlighter-rouge">IT IS</code> letters, which have been on pretty much that entire time.</p>
<p><img src="/assets/img/wordclock/2017-04-22 23.44.33.jpg" alt="Before and after" /></p>
<p><img src="/assets/img/wordclock/2017-03-22 00.32.37.jpg" alt="Assembled board" /></p>
<p>I probably still have the layout and Gerber files somewhere. No promises, but if you’re reading this and think they’d help, feel free to ping me. I’ll look for them.</p>
<p>Thanks for reading!</p>Ryan ConwayFor when digits and hands are just too much. 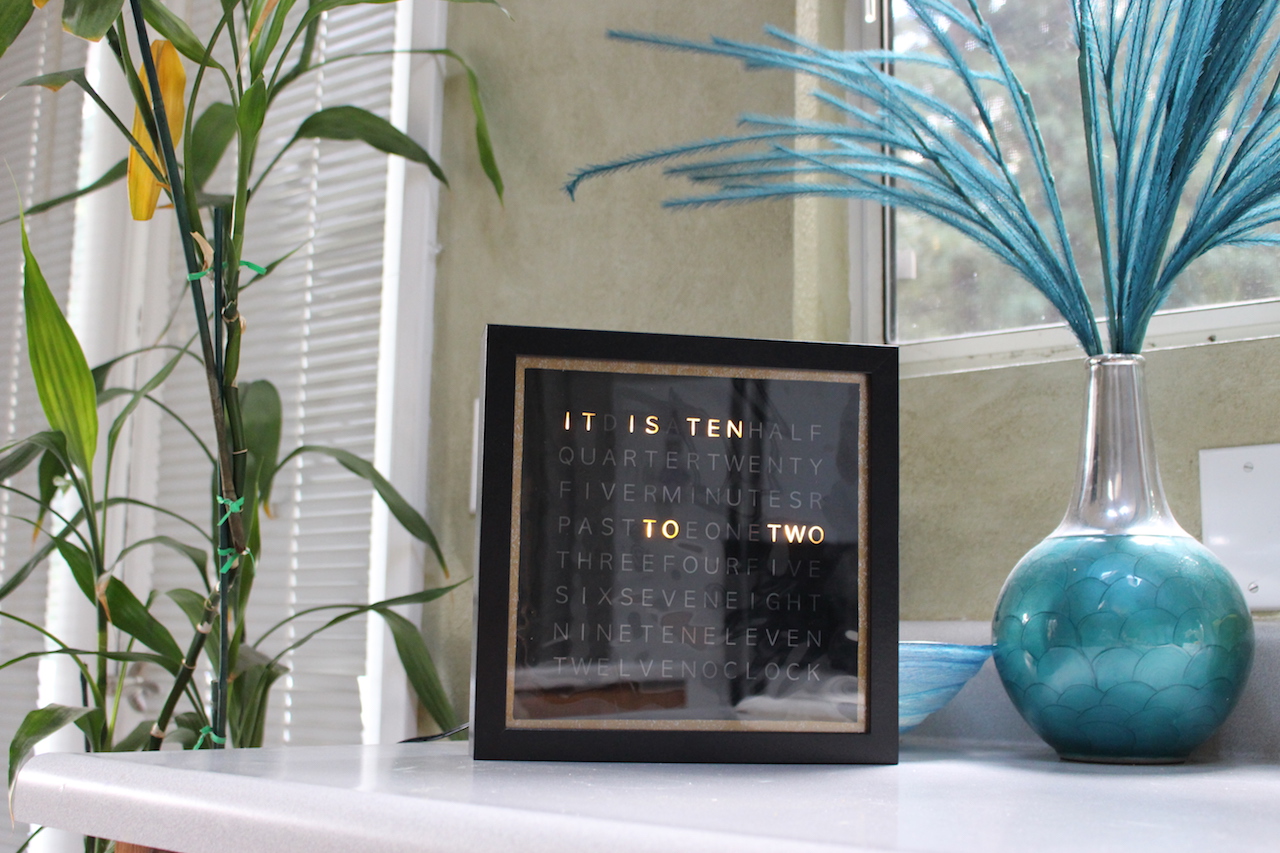Alien Animatronic2017-01-18T21:05:00+00:002017-01-18T21:05:00+00:00https://rmconway.com/alien-animatronic<p><img src="/assets/img/alienanimatronic/inaction.gif" alt="Skreee!" /></p>
<p>It was October, and it had been a while since I did anything with motors. So I built a little animatronic!</p>
<p>I helped host a Halloween party at a friend’s place, and this guy greeted our guests from the back of my parked car.</p>
<h1 id="overview">Overview</h1>
<ul>
<li>Tech: DC gearmotor + high power LED</li>
<li>Mounting: Motor hub & mount + styrofoam ball + wooden dowels</li>
<li>Build date: October 2016</li>
</ul>
<h1 id="design">Design</h1>
<p>Since the party was at a house in the woods, the idea was to park my car askew and have an alien peek out the back, implying he was hiding out and up to no good. The idea pretty much fell into place after I saw <a href="https://www.amazon.com/gp/product/B0108FJW0A/ref=oh_aui_detailpage_o05_s00?ie=UTF8&psc=1">this sweet alien mask that kinda looks like a fish</a>. I had a futuristic looking cape from an old cosplay that he could wear, and figured I could pulse a green LED behind him for some scifi vibes.</p>
<h1 id="animating-the-mask">Animating the Mask</h1>
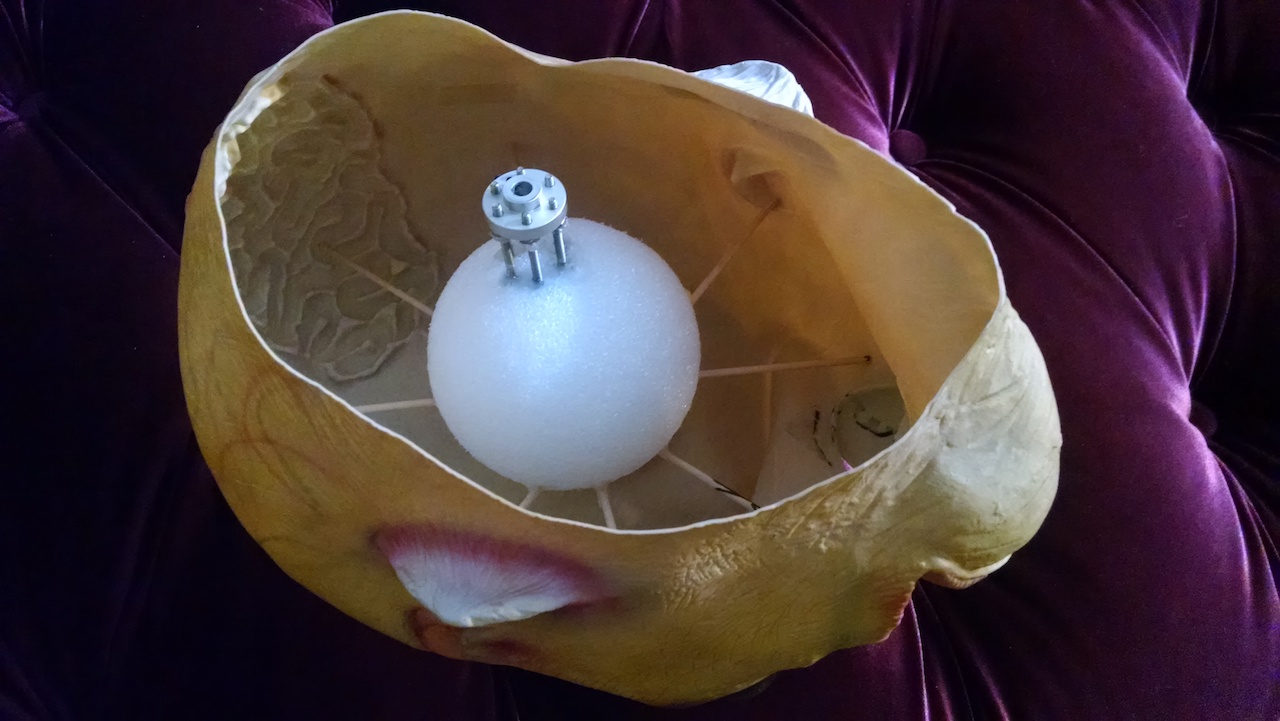
<p><img src="/assets/img/alienanimatronic/2017-01-20 20.54.14.jpg" alt="Mask mounting assembly" /></p>
<p>Getting radial motion from a shaft is easy enough: power a DC gearmotor through an H-bridge and control its speed with PWM. I got that with a Jameco motor, off-the-shelf H-bridge board and an Arduino. The hard part for me, coming from a nonmechanical background: how do you leverage that motion to rotate a 23” diameter mask?</p>
<p>My answer was lots of adhesive! And wooden dowels, long screws, and a motor hub.</p>
<p>The motor hub was a hobbyist unit that fit my 12V gearmotor’s shaft, and had several threaded holes with which one would normally attach a wheel. But I couldn’t just get 23” wheels. Even if I was willing to drop the money, they’d weigh down the motor. Instead, I took a few 2” screws, held them in the hub with nuts and thread locker, and crammed those screws into a styrofoam ball. I drove a bunch of wooden dowels through that ball, approximating the inner diameter of the mask, and held them in place with hot glue.</p>
<p>If there’s anything I learned in mechatronics class, it’s that simple, brute force solutions can be really effective.</p>
<p>I programmed a basic state machine to make the mask rotate back and forth. I gave it a low probability of doing a double-take, and an even lower probability of spinning in a complete circle, because why not?</p>
<h1 id="pulsing-the-high-power-led">Pulsing the high-power LED</h1>
<p>The cool thing about H-bridges is that it’s while they’re generally marketed for use with motors, they’re really just power drivers that you can use to put current through anything. The board I bought for driving the motor had two of them, so I used the one left over to drive a high power LED. I stuck the LED to a stock Intel CPU cooler I had lying around with some thermal paste and hot glue. I wanted to use thermal adhesive tape, but couldn’t get a hold of any in time. The passive cooling turned out to be plenty, and I didn’t have to drive the cooler’s fan.</p>
<p>I made another state machine to pulse the LED on and off, usually slowly but sometimes quickly, and made it flicker randomly.</p>
<h1 id="mounting-the-components">Mounting the Components</h1>
<p><img src="/assets/img/alienanimatronic/2016-10-29 00.22.08.jpg" alt="Mask mounting assembly" /></p>
<p>To mount the mask assembly, I attached the motor to a hobbyist bracket, attached that bracket to a slab of wood, and attached that slab of wood to another slab of wood with a couple right angle brackets.</p>
<p>That second slab held the H-bridges and the Arduino, and mostly importantly provided a surface to strap the whole thing down. I tied it all down to a box of dumbbells with a bungee cord. Without a heavy platform, the whole thing jerked a bunch and probably would’ve fallen over. The motor generated a surprising amount of torque.</p>
<h1 id="making-the-alien-body">Making the Alien Body</h1>
<p>I put everything on top of a bunch of books that I held in place with wooden wedges. I draped the old cape over the books and propped up one of its long sleeves to the side of the cabin. I took advantage of it being hard to see at night and didn’t focus too much on the details.</p>
<h1 id="gallery">Gallery</h1>
<p>Here it is in action:</p>
<iframe allowfullscreen="" frameborder="0" height="315" src="https://www.youtube.com/embed/xuWwpDGH8xo" width="560"></iframe>
<p><br /></p>
<h1 id="documents">Documents</h1>
<ul>
<li><a href="https://docs.google.com/spreadsheets/d/1y8l7H8diMvLhjSow7c-xoUVFOXhhcHXPGHP0gJOvv8E/edit?usp=sharing">Parts list</a></li>
<li><a href="https://github.com/PumpMagic/OdysseyHalloween">Firmware</a></li>
</ul>
<h1 id="lessons-learned">Lessons Learned</h1>
<ul>
<li>Don’t be afraid to use adhesives like hot glue and thread locker. Especially for oneoff projects such as this. At first I tried mounting the mask using only removable fasteners like keps nuts and lock washers, hoping to make everything readily reusable. Only after that failed several times did I resort to more permanent adhesives.. and they worked first try.</li>
<li>Don’t take mounting for granted! That took more time than anything else.</li>
</ul>
<h1 id="where-to-go-from-here">Where to Go from Here</h1>
<p>It was rewarding to build something that felt alive and that made people smile. Or gave them the heebie jeebies. I’ll take that too.</p>
<p>I’d like to play around with animatronics some more, and have already gotten some 16 gauge aluminum to do so.</p>
<p><strong>See you next Halloween!</strong></p>Ryan ConwayA greeter for our Halloween party.